Implementing AntSnes with Qt part 2: Creating Settings View
I’m using the Qt now, so I wanted to make a new fresh clean look to the UI. Therefore I dumped the old S60 UI style, which really wasn’t good design for touch devices.
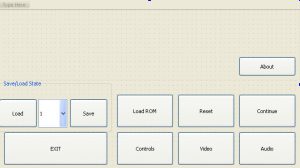
You can see my settings view in the picture below. The empty space on top of the view is for the Main/settings widget. The main widget which is empty in the picture will have a AntSnes logo, and maybe a screencapture from the currently selected saved state, which could be shown on top of the savestate box. When user click some settings button such as controls/video/audio the main widget will change to show selected settings.
On upper panel there’s obious selections for “Load ROM”, reset, and continue. On application startup, you can just press continue to continue playing the previous game you were playing on last time.
Implementing the settings view is really straightforward, all you have to do is to connect all the clicked signals from buttons to proper slots in you implementation class, and ask the view manager to change to the emulation view, if it’s required.
Saving settings:
Saving the settings is really easy in the Qt. You can save all settings as value pairs to the QSettings class. See the example below.
1
2
3
4
5
//set version to settings
QSettings settings;
 settings.setValue("version", KAntSettingsVersion );
//read the string back
int version = settings.value("version").toInt();
