Creating a SOCKS5 proxy for Diablo III
Here’s a simple tutorial how to create SSH Tunnel and Socks proxy to play Diablo III behind a firewall, or just to avoid 3007 errors. You’ll only need a SSH server where you can connect to.
Creating the SOCKS5 SSH tunnel with Putty
Step 1
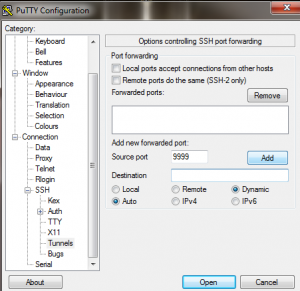
Open Putty and go to the Tunnels menu. Set source port to 9999, and then set Dynamic as the port type, and press Add.
Step 2
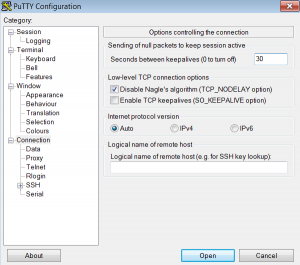
To prevent unwanted disconnects from the SSH server you should set a value to “seconds between keepalive packages”. Open the Connections menu and set some value to seconds between the keepalive packages. 30 seconds is smaller than my server’s disconnect time, so that’s fine for me.
Set the seconds between keepalive packages to 30
Step 3
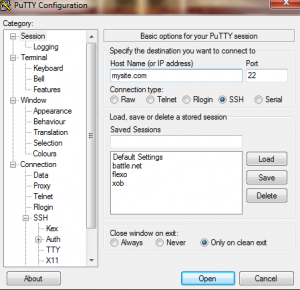
Open the session page, and connect to SSH Server. Just replace the Host Name “mysite.com” with the server you want to connect to.
You can also save your session in this page (if you don’t want to configure the SSH tunnel again) by writing a name into the saved session, and then pressing save.
Write your server address to the host name and press Open
Choosing the Proxifier Software
The Proxifier is a proxy server, that can route your traffic though the SOCKS SSH tunnel, that we just created. The Diablo III uses UPD, so you should choose Proxifier SW that supports the SOCKS5 UDP Associate. You can get pretty good comparison at Wikipedia article here: http://en.wikipedia.org/wiki/Comparison_of_proxifiers I decided to use Widecap, since it’s for windows, it supports UDP, and it’s free.
Configuring Widecap for Diablo III
The Widecap UI is a bit messy, but you’ll get used to it 🙂
Step 1
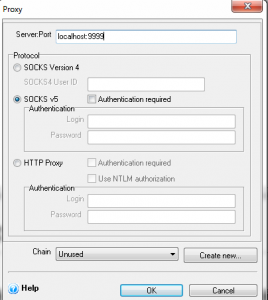
Create a new proxy by clicking proxies/new proxy button. Then set the Server port into localhost:9999 (the SOCKS tunnel we just created). Then create a new Chain by clicking the ‘Create new’ button at near the chain. You should invent a better name to your chain than the “Unused”
Connect to localhost:9999, and Create a new Chain, and click OK
Step 2
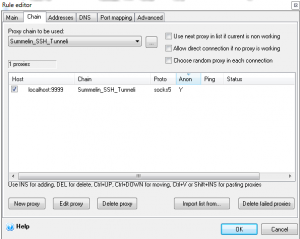
Create a new rule, by clicking the “new rule” button under the network. You can give a name to your rule in the Main tab. Next click the chain tb, and set the proxy chain you to the rule that you created in Step1.
Set the chain into to the rule that you created in step 1
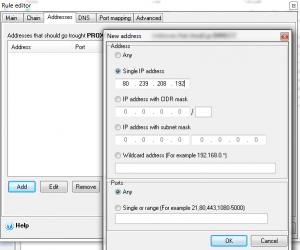
Now you can add the real rule, by clicking the address tab, and adding a new address rule. In this example I used only 80.239.208.193, which is the eu.actual.battle.net, but if you’re behind some nasty firewall you should just choose to route all ports by choosing the option “Any”.
Please also notice that the eu.actual.battle.net might later resolve into some other IP than 80.239.208.193, if you want to only route that domain, you should ping eu.actual.battle.net and see what it resolves.
Create new rule, and set the IP
Currently it seems that playing the Diablo III causes about 15-20MB of traffic to the eu.actual.battle.net so it’s not eating too much bandwidth from my SSH server.
Step 3
Configure the Diablo III to use the newly created rule. Click to the view programs page. Then Drag and Drop the Diablo III.exe file into the programs area. After this right-click the Diablo III.exe, and choose “modify program”. Then choose the rule you created in the Step 2 for the Diablo III and press OK. If you’re behind a firewall, you should also add the same rule for the Diablo launcher, so it can update the Diablo III for you.
Set the newly created rule for Diablo III.exe
Protip: install openSSH server to port 443
Many public networks at the airports etc. have quite strict firewall rules, so you can’t normally access to the SSH via port 22. My favourite hack is to run the OpenSSH server at 443 port, so I can connect into it pretty much from anywhere I like. The best part is that with SOCKS5 proxy I can even play Diablo III by bypassing these firewalls.
